Direct extruder
April 30, 2022, 2:09 p.m.Some time ago I decided to convert my Creality Ender 6 into a direct extruder printer. For the newbies, an extruder is simply a material feeder to a print head. Since I have some experience with rebuilding from the previous Creality Ender 3, I knew what I was getting into. However, there are many more options today than there were about 2-3 years ago.
First of all, I would like to explain what Direct, in Czech, a direct extruder is and what are the fundamental differences between the “classic” Bowden solution. For the uninitiated, a bowden is a Teflon tube through which the filament is guided.
Most of the cheaper printers are equipped with an extruder, which is rigidly screwed to the printer structure and feeds the filament to the print head through a long bowden. But the direct extruder is attached directly to the print head, which has its advantages and disadvantages.
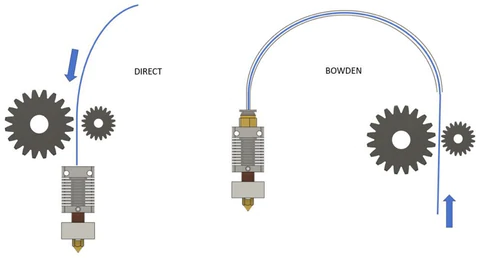
Direct and Bowden extruder
(source: https://thinkspace.pl/en/which-extruder-should-you-choose-bowden-vs-direct)
The main advantage of a direct extruder is that the distance between the feed wheels and the nozzle is reduced to a minimum. Thanks to this, the extruder has significantly better control over the material in the print head and thus also in the nozzle itself. Thanks to this, it is also possible to significantly shorten retractions, which can be seen in the resulting printing time. Another advantage of most direct extruders is the ability to print more types of materials, such as flexi (soft) materials. Sometimes the possibility of using a smaller and therefore cheaper engine, which also has less consumption, is also given as an advantage. These two arguments are very controversial in my opinion, because if I didn’t add the extruder to the direct one, I don’t need to buy a new “cheaper” motor at all. It follows that this applies only to printers that are equipped with a direct extruder already from the factory, or the old engine on the printer will go to the eternal hunting grounds. As for the lower consumption of the smaller motor, I think they will use the motors for movement in the X and Y axes due to the greater weight of the print head.
Everything has its pros and cons and the direct extruder is no exception. As the main disadvantage, I would see the already mentioned significant increase in the weight of the print head, which is a very important parameter, especially at higher speeds. A negative consequence can be reduced print quality, but even this can be partially compensated for. We can talk about that next time. Due to the higher weight of the print head, there is an increased load on the motors for moving the printer in the X and Y axes, which can lead to their overheating, especially when the printer is covered, and thus reduce their liveliness.
Why did I decide to switch to Direct? What led me personally to this was that the Ender 6 has a very long bowden due to its large printing area and the location of the original extruder. The original length was around 1 meter. After I bought the printer, I moved the extruder closer to the mat and the bowden was shortened to approx. 50 cm. Despite that, I did not get below 6 cm of retraction at a speed of around 30-35 mm/s. If I wanted to have a really nice looking print even in places of retraction, I had to go to 8 mm and that is really a lot. Direct extruders usually have retractions below 1 mm, rather around 0.5 mm, which is a fundamental difference.
When I was deciding which extruder to get, I had a few solutions in mind. Extruders from BondTech LGX Lite, BIQU H2 and E3D Hemera were shortlisted. The last two mentioned are all-in-one solutions, in other words, they contain an extruder with a motor, a heatblock, a heatbrake and a heatsink in the package. LGX Lite is more like a puzzle, where you can buy only the extruder itself without a motor, as well as with a motor. The user can choose from a number of compatible hotends (various adapters can be purchased) or he can invent and assemble the entire system himself.
My good 3D printer friend Jiří Loveček, whom I know from our FB group on Ender 6, took this path. He combined the LGX Lite with the Trianglelab dragon hotend and mounted it on the sixth generation Hero Me holder. With this combination, it can be said that he preserved the printing area of 260x260 mm. He is currently designing a new holder that is based on the Klemco holder and could increase the printing area to an estimated 265x265 mm. Since the printing area is one of the most important parameters for me, I found out how BIQU is doing. After choosing the most suitable holder, I got similar values, which was enough for me. Unfortunately, the Hemera falls short in this regard, as it is significantly larger than the BIQU itself. Another reason why I chose BIQU H2 was the price, as it is the cheapest solution (approx. 2,000 CZK) of the above and is sufficient for my purposes.
For an idea, I am attaching a photo of the model of the Klemco base holder that Jirka sent me, including the dimensions. The width of the extruder, even with all peripherals installed, is 101.3 mm. The depth is then less than 63 mm, but without between the plates, which will be approx. 5 mm. The total size will therefore be approx. 101.3x68 mm. For comparison, my BIQU measures exactly 86x62 mm. Thanks to this, I was able to increase the printing area to a beautiful 270x272 mm (X and Y axis). A sharp eye will definitely notice that there are two Blowers 5015 on the holder from Jirka, but only one on my BIQU. It is clear from this that Jirk’s solution will be slightly larger, but will also have a greater cooling capacity.

LGX Lite on custom Klemco mount
It required a good amount of preparation for the conversion itself, because the worst thing that can happen to a person is that, after disassembling the entire printer, he finds that he is missing a part to print, which of course happened to me… Fortunately, it was only the rear guide chain holder, sometimes also called as cable stacker. It was survivable without it and at least I had a test object to adjust the printer after upgrading it.
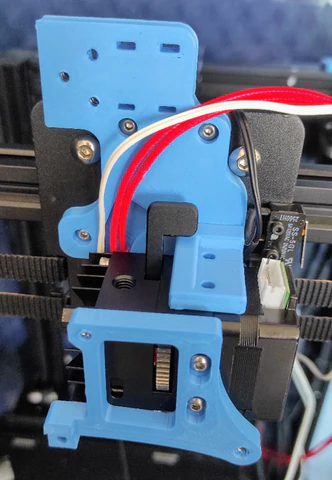
Partially fitted
Once I had all the cables extended with the correct connectors, I fitted the extruder bracket and the extruder itself as seen in the picture. This was followed by the installation of a fan to blow the print and finally BlTouch. All I needed was a bunch of M3 screws and a lot of torque to tighten them. After the correct electrical connection, everything surprisingly worked, so I started debugging the firmware. I have mentioned in the past that I have a FW Klipper which will help with calibration in many ways. Changing all important parameters is literally a matter of a few tens of seconds. But we will probably talk more about Klipper in the next article, so I won’t go into details. Just to clarify, all the blue parts are printed.
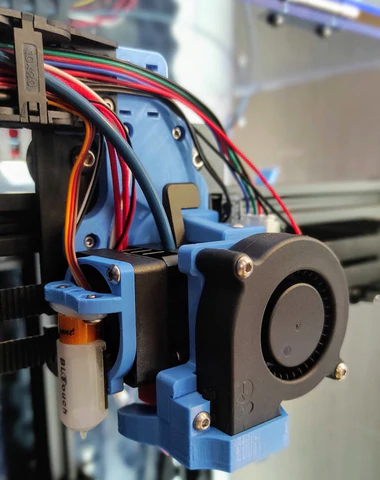
Upgrade Complete
As mentioned above, the first print was that forgotten holder and I was very happy with the result. However, as is my good habit, the first problems came before long. Since I mostly print single-sided prints on Vase mode, I found that my print literally flows under the print head, especially at the overhangs. After adjusting the thermistor type, the tests improved, but it was still not ideal. As a result, the shortcomings of the printing were a combination of unsuitable material, printing temperature, covering of the printer and just a different type of thermistor. From long-term observation, I discovered that this hot end heats up the material more and it is not easy to print with it at lower speeds of around 20 mm/s, which proved to be the most effective for me in terms of quality on Vase mode. The fact that I have the printer covered also helps. Very slow prints without a single defect will therefore be a pain for some time to come.
But as for classic faster prints around 100-120 mm/s, the print quality is very nice there. I am currently trying to fine-tune the FW settings so that it is possible to print even faster and better.
Lukáš Židek